


How to: Highlight and Contour
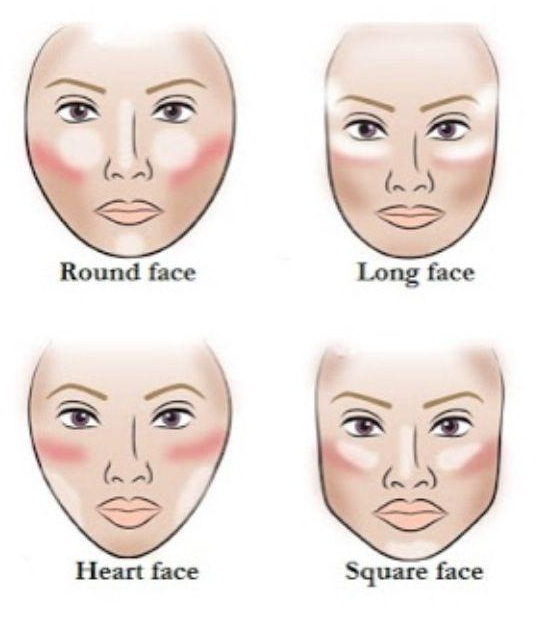
Photo courtesy of @airsafecarryon
October 1, 2015
Most people think contouring and highlighting is intimidating but once you try it, you’ll see it’s very simple (thanks to the thousands of makeup artists on social media). It’s amazing that because of YouTube and Instagram people have access to professional techniques to use in their everyday lives.
Highlighting and contouring is basically plastic surgery without ever going under the knife. It’s used to make your face appear slimmer, or make your best features stand out.
Before you start to play around with different fun products, you must first identify your face shape; the common shapes are oval, heart, square and round. Each face shape has a different technique because every face is unique.
Contouring can be defined as “the technique of using shading to enhance and define facial features.” To contour, you can apply either a powder or cream that is two or three shades darker than your skin tone onto the hollows of your cheeks, on the sides of your nose, and even on your collarbones. If you have a round face, you can use this technique to make your bone structure appear the way you want.
Have a big forehead and want it to look smaller? All you have to do is take your contour color around your hairline and temples. The best way to find the hollows of your cheeks, so you are able create defined cheekbones, is to suck your cheeks in. Starting from the top of the hollow you can use your contour shade and place it just beneath the area that is sunken in. You don’t want to contour all the way to your lips; stop about two inches from the corner of your mouth. To create a slimmer nose, blend two lines of your contour shade from the start of you eyebrows down to the sides of the bridge of your nose.
It’s preferred to highlight when contouring. If you don’t, you probably wouldn’t like the results, but there are some exceptions depending on your facial features. Highlighting is important because it brings the light back into your face after applying a dark shade. To highlight, you can use a cream or powder that is two or three shades lighter than your skin color. Apply it underneath your eyes, on the center of your forehead, on your chin and down the middle of your nose.
Highlighting can either be your enemy or your best friend. Some people can just skip the highlighting step altogether or just keep it to a minimal, since highlighting is meant to bring forward certain parts of your face. If you feel you have a very wide nose you may not want to accentuate it so you would either not apply a highlight shade or only apply a small amount.
When I’m doing my makeup I personally like to use a setting powder on top of my cream highlight, just to avoid it from cracking or looking caked on. Using a setting powder can also help keep your makeup in place all day.
If you ask anyone that has the slightest clue about makeup, they will tell you that blending is the most important aspect of makeup everywhere. If you’re a beginner, I would recommend using a sponge to blend any cream product you place on your face. To avoid creating a muddy looking mess, it is ideal to use two different sponges for your highlight and contour.
There’s also a second step to highlighting: instead of using just a matte concealer to highlight, you can use a shimmery powder or cream to add dimension and reflection. It is best to apply your highlight to the tops of your cheekbones, down the bridge of your nose (where you applied your first highlight), on your chin and then just throw some sparkle on your cupid’s bow (the top edge of your upper lip) – now you’re glowing and ready to go.
Once you get comfortable with the techniques and find a way that works for you, contouring and highlighting won’t be such a science but rather something that comes naturally.